What is a SMART Board?
A SMART Board is a
large, digital, touch-enabled whiteboard which outputs a video source such as
the display from a PC, laptop or document camera. You can write on the board in
digital ink with a special pen and you can interact with PC applications or
document camera images on the board.
The following video
provides a short introduction on using a SMART Board - https://www.youtube.com/watch?v=XMiQIudsSTA

...a remote control

- Log on to the PC
- Press the red power
button on the remote control to turn on the projector
- Wait for 30-60 seconds for the
projector image to display on the screen
The SMART Board is
ready to use when the indicator light on the bottom right of the board is a
steady green.
When pressing the power button on the remote, you may see a
message "Press off?"
This means that the projector is in sleep mode. To come out
of sleep mode, press the Enter button, or one of the direction
buttons, on the remote.
...SMART document camera


- Press the power button on
the doc cam
- Select the source to project
onto the SMART Board by using the control panel buttons on the base of the
document camera, i.e.
- Select Computer if
you want to project the Presentation PC
- Select Camera if
you want to project the document camera imag.
...Lumens document camera

Select the source to
project onto the SMART Board by using the power button on the document camera
- Switch OFF the
Document Camera to project the Presentation PC
- Switch ON the
Document Camera to project the document using the document camera.
Using the AMX keypad

- Log on to the PC
- Press Projector On on
the keypad
- Wait for the Projector On
button light to stop flashing and the projector to output an image
- Press the Main PC button
The SMART Board is
ready to use when the indicator light on the bottom right of the board is a
steady green

Image output
The image displayed on
your PC monitor will be projected on the SMART Board, together with the SMART
Board software toolbar on the left hand side.

Annotating the board
The pen tray contains
different colour coded digital pens and an eraser. After you pick up any item,
you will see the blue light, which means that the item is in operation.
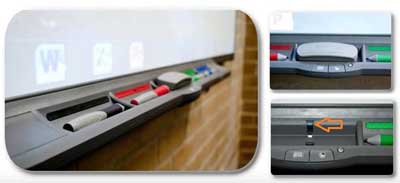
You can use the pens
to draw, write or highlight on the SMART Board screen. To erase your markings
on the screen, use the eraser. The pen tray automatically detects which item
you have selected, which allows you to write on the board or erase with your
finger, so long as you pick up the item.

If you want to use the
pen as a mouse, press the right click button on the pen tray

You can use the SMART
Notebook software to create presentations using a combination of the computer,
document camera, and the SMART Board screen. You can then save the presentation
as a SMART Notebook file.

- Ensure the PC is displayed on
the SMART Board
- Start the SMART Notebook
software, either by
- clicking the Notebook icon
on the SMART Board software toolbar
- clicking Start > All
Programs > Smart Technologies > SMART
Notebook 11
- Select File > New to
create a new blank file if one doesn't open automatically.
- Add/remove objects or notations
using the PC or the SMART Board screen
- Select the Add Page icon
in the toolbar to create an additional blank page while preserving the
existing page
- Select the Document
Camera icon on the toolbar in order to incorporate the document
camera display in the SMART Notebook file
No comments:
Post a Comment